# KB Sonic Suisse

# Duo Security

# Changement téléphone Duo Security

<table border="1" cellpadding="0" cellspacing="0" class="MsoTableGrid align-center" id="bkmrk-s%C3%A9lectionnez-%C2%AB%C2%A0other" style="border-collapse: collapse; border: none; width: 95%; height: 1661px; border-spacing: 0px;"><tbody><tr style="height: 20px;"><td style="width: 50.0013%; border: 1pt solid windowtext; padding: 0cm 5.4pt; height: 20px;" width="302">
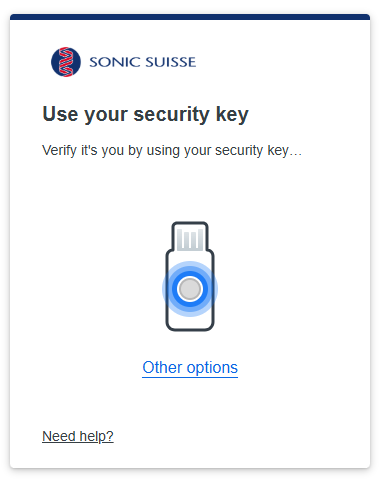
Sélectionnez « other options »

</td><td style="width: 50.0013%; border-top: 1pt solid windowtext; border-right: 1pt solid windowtext; border-bottom: 1pt solid windowtext; border-image: initial; border-left: none; padding: 0cm 5.4pt; height: 20px;" width="302"><span style="mso-no-proof: yes;">[![Capture d'écran 2024-11-28 094033.png](https://notes.slyc.ch/uploads/images/gallery/2024-11/scaled-1680-/capture-decran-2024-11-28-094033.png)](https://notes.slyc.ch/uploads/images/gallery/2024-11/capture-decran-2024-11-28-094033.png)  
</span>

</td></tr><tr style="height: 39px;"><td style="width: 50.0013%; border-right: 1pt solid windowtext; border-bottom: 1pt solid windowtext; border-left: 1pt solid windowtext; border-image: initial; border-top: none; padding: 0cm 5.4pt; height: 39px;" width="302">
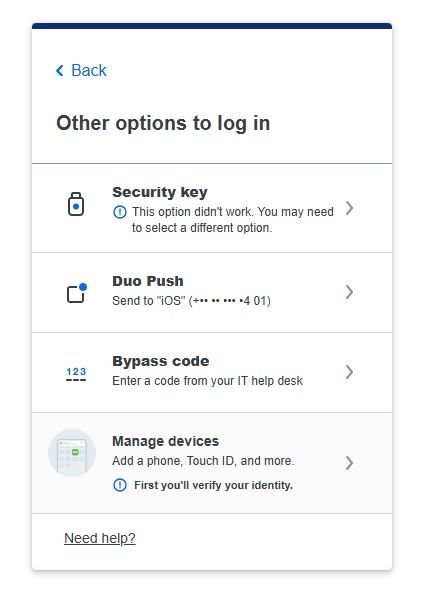
Ensuite, cliquez sur la dernière option qui devrait être « manage devices »

</td><td style="width: 50.0013%; border-top: none; border-left: none; border-bottom: 1pt solid windowtext; border-right: 1pt solid windowtext; padding: 0cm 5.4pt; height: 39px;" width="302"><span style="mso-no-proof: yes;">[![Capture d'écran 2024-11-28 094136.png](https://notes.slyc.ch/uploads/images/gallery/2024-11/scaled-1680-/capture-decran-2024-11-28-094136.png)](https://notes.slyc.ch/uploads/images/gallery/2024-11/capture-decran-2024-11-28-094136.png)  
</span>

</td></tr><tr style="height: 77px;"><td style="width: 50.0013%; border-right: 1pt solid windowtext; border-bottom: 1pt solid windowtext; border-left: 1pt solid windowtext; border-image: initial; border-top: none; padding: 0cm 5.4pt; height: 77px;" width="302">
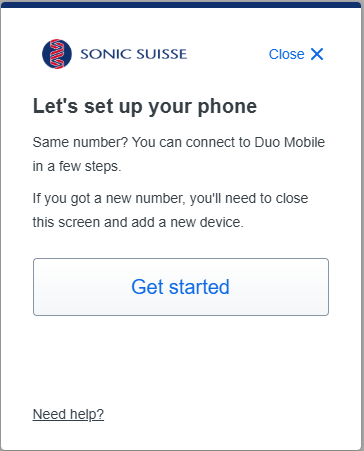
Cliquez sur l'option de votre ancien téléphone. Vous devriez recevoir une notification sur l'ancien téléphone qu'il vous faudra accepter.

</td><td style="width: 50.0013%; border-top: none; border-left: none; border-bottom: 1pt solid windowtext; border-right: 1pt solid windowtext; padding: 0cm 5.4pt; height: 77px;" width="302"><span style="mso-no-proof: yes;">[![Capture d'écran 2024-11-28 094600.png](https://notes.slyc.ch/uploads/images/gallery/2024-11/scaled-1680-/capture-decran-2024-11-28-094600.png)](https://notes.slyc.ch/uploads/images/gallery/2024-11/capture-decran-2024-11-28-094600.png)  
</span>

</td></tr><tr style="height: 134px;"><td style="width: 50.0013%; border-right: 1pt solid windowtext; border-bottom: 1pt solid windowtext; border-left: 1pt solid windowtext; border-image: initial; border-top: none; padding: 0cm 5.4pt; height: 134px;" width="302">Vous allez arriver sur une page similaire où vous devriez retrouver votre téléphone actuel. Vous pouvez utiliser la fonction « I have a new phone » (cela dans le cas où vous avez toujours le même numéro de téléphone ; sinon, il vous faut choisir l’option « Add a device »).

</td><td style="width: 50.0013%; border-top: none; border-left: none; border-bottom: 1pt solid windowtext; border-right: 1pt solid windowtext; padding: 0cm 5.4pt; height: 134px;" width="302"><span style="mso-no-proof: yes;">[![Capture d'écran 2024-11-28 094939.png](https://notes.slyc.ch/uploads/images/gallery/2024-11/scaled-1680-/capture-decran-2024-11-28-094939.png)](https://notes.slyc.ch/uploads/images/gallery/2024-11/capture-decran-2024-11-28-094939.png)  
</span>

</td></tr><tr style="height: 58px;"><td style="width: 50.0013%; border-right: 1pt solid windowtext; border-bottom: 1pt solid windowtext; border-left: 1pt solid windowtext; border-image: initial; border-top: none; padding: 0cm 5.4pt; height: 58px;" width="302">Vous n’avez plus qu’à suivre les instructions à l’écran qui vous permettront de remplacer l’ancien téléphone par le nouveau.

</td><td style="width: 50.0013%; border-top: none; border-left: none; border-bottom: 1pt solid windowtext; border-right: 1pt solid windowtext; padding: 0cm 5.4pt; height: 58px;" width="302"><span style="mso-no-proof: yes;">[![Capture d'écran 2024-11-28 095407.png](https://notes.slyc.ch/uploads/images/gallery/2024-11/scaled-1680-/capture-decran-2024-11-28-095407.png)](https://notes.slyc.ch/uploads/images/gallery/2024-11/capture-decran-2024-11-28-095407.png)  
</span>

</td></tr></tbody></table>

# Outlook

# Problème de droit Calendrier Outlook

### Problèmes de permissions

S'ajouter dans l'adresse en question et depuis outlook web vérifier si la personne à bien les droits correctement pour modifier (pas simplement être en read)

[![Capture d'écran 2024-12-02 152808.png](https://notes.slyc.ch/uploads/images/gallery/2024-12/scaled-1680-/slicapture-decran-2024-12-02-152808.png)](https://notes.slyc.ch/uploads/images/gallery/2024-12/slicapture-decran-2024-12-02-152808.png)

# Reconnexion Outlook Citrix Medisyn

Bonjour,  
  
Suite à la migration, il est possible qu'Outlook sur Citrix ne veuille pas se reconnecter. Voici les manipulations à faire si, lorsque vous essayez de vous reconnecter à l'adresse sur Citrix, cela ne fonctionne pas.

<table border="1" id="bkmrk-rendez-vous-dans-le-" style="border-collapse: collapse; width: 100%; height: 987.436px;"><colgroup><col style="width: 50%;"></col><col style="width: 50%;"></col></colgroup><tbody><tr style="height: 246.859px;"><td style="height: 246.859px;">Rendez-vous dans le coin en haut à gauche sur "Fichier".</td><td style="height: 246.859px;">[![image.png](https://notes.slyc.ch/uploads/images/gallery/2025-01/scaled-1680-/image.png)](https://notes.slyc.ch/uploads/images/gallery/2025-01/image.png)

</td></tr><tr style="height: 246.859px;"><td style="height: 246.859px;">Ensuite, cliquez sur \[1\] "Paramètres du compte", puis \[2\] "Paramètres du compte...".</td><td style="height: 246.859px;">[![image.png](https://notes.slyc.ch/uploads/images/gallery/2025-01/scaled-1680-/V4Limage.png)](https://notes.slyc.ch/uploads/images/gallery/2025-01/V4Limage.png)

</td></tr><tr style="height: 246.859px;"><td style="height: 246.859px;">Vous devriez voir votre adresse @medisyn.ch dans la fenêtre. Cliquez sur "Nouveau".</td><td style="height: 246.859px;">[![image.png](https://notes.slyc.ch/uploads/images/gallery/2025-01/scaled-1680-/0tUimage.png)](https://notes.slyc.ch/uploads/images/gallery/2025-01/0tUimage.png)

</td></tr><tr style="height: 246.859px;"><td style="height: 246.859px;">Outlook va probablement mettre automatiquement l'adresse @aurigen.ch. Si cela n'est pas le cas, vous pouvez simplement la mettre manuellement.

Une fois que vous avez appuyé sur "Connexion", une fenêtre supplémentaire devrait s'ouvrir où vous pourrez taper votre mot de passe aurigen.ch afin de vous reconnecter.

</td><td style="height: 246.859px;">[![image.png](https://notes.slyc.ch/uploads/images/gallery/2025-01/scaled-1680-/XgFimage.png)](https://notes.slyc.ch/uploads/images/gallery/2025-01/XgFimage.png)

</td></tr></tbody></table>

Il est possible qu'Outlook continue d'afficher l'adresse avec @medisyn.ch, ce n'est pas un problème car elle est maintenant liée à @aurigen.ch.

En cas de problème, je suis évidemment sur Biopôle à des fins de support.